Learn Dropwizard: A Practical Guide to Developing REST APIs with Java

Nov 26, 2023

Photo by Erick Butler on Unsplash
In this article, we'll explore the world of dropwizard, from what it is and understanding each of its component, to building a simple web service in IntelliJ IDEA .
It further provides features such as configuration, logging, validation, and health checks that make it easy for the developer to develop, test and deploy their applications in no time.
Let's first breakdown the dropwizard into four components:
- Application: This is the main class of our project, where we define the name, version, and configuration for our service. We also register the resources, health checks, and other components that we want to use.
- Configuration: This class represents the configuration, such as the port at which we want our service to listen to and accept incoming requests, database, and other settings. We make use of YAML file to specify the configuration values, and the dropwizard automatically maps them to the field of configuration class using Jackson. We can also use environment variables or system properties to override the configuration values.
- Resource: This class defines the endpoint of our service, where we handle the HTTP requests and responses. We use annotation from Jersey and Jackson to specify the path, method, parameters, and response formats. We also use Hibernate validator to validate the input and output of our resource methods.
- Health Check: This class help us check the health of our service, such as the database connection, the external dependencies, or the internal state. We can register the health checks in our application class, and Dropwizard will expose them as a special endpoint (/healthcheck) that we can use to monitor our service. We can also use Metrics to collect and report various metrics about our service, such as the RPS, response time, error rate, and memory usage.
Our Wizard fighting complex frameworks
Setting up our first Dropwizard Project
As mentioned above, we'll be using IntelliJ IDEA to build our dropwizard application. It makes our life a lot easier because we don't have to manually go and take care of Maven or Java. It's a simple dropdown experience, we specify the name of the project: Dropwizard, the JDK we are going to use: Java 21 and the dropwizard archetype.

IntelliJ IDEA
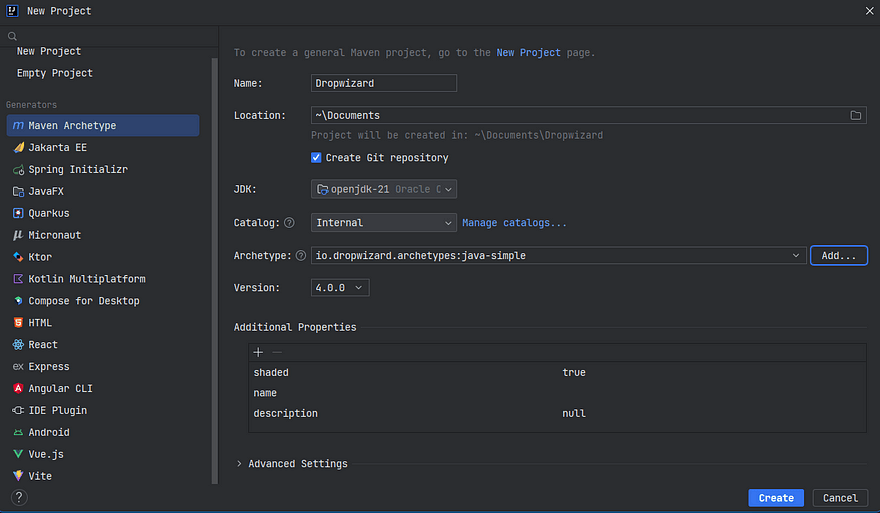
New Project
We are going to add a dropwizard archetype by clicking on add, and fill on the following details:
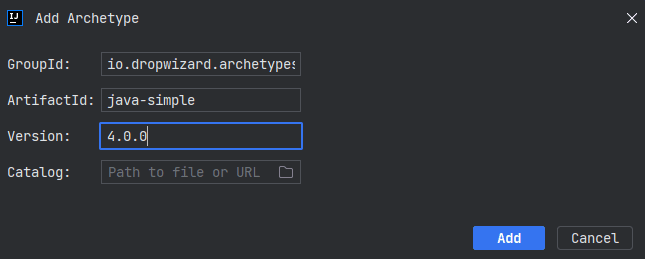
Selecting Dropwizard Archetype
1GroupId: io.dropwizard.archetypes
2ArtifactId: java-simple
3Version: 4.0.0
In additional properties, we can change the name and description to anything as per our liking and leave other properties as defaults and click on create. This will create a boilerplate for our application with all the classes that we talked about.
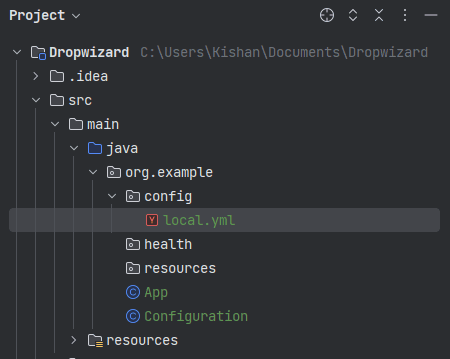
Following is the project structure that this archetype provided. A few of the directories are not needed such as api, client, core, and db at this moment, so we can safely delete them.

Setting up our Hello World
Please Note: you can find all the following code on my github repo: Github (ConfusedConsciousness)
Since we are working with the dropwizard application, it would make sense to create a RESTful endpoint that greets us with Hello World, what do you say?
Say after running our application, if we go to the /greet endpoint, we should get a "Hello World" response.
Also, to make our life a bit easier I am going to make use of Lombok to create getters and setters for us, this way we don't have to manually create them. All we'll need is to annotate the class with@Data annotation.
Let's go to our POM and add the following dependency.
1<!-- <https://mvnrepository.com/artifact/org.projectlombok/lombok> -->
2<dependency>
3    <groupId>org.projectlombok</groupId>
4    <artifactId>lombok</artifactId>
5    <version>1.18.30</version>
6    <scope>provided</scope>
7</dependency>
Before running our application, we'll need to create a config file (YAML), let's call it local.yml. Notice, that I have deleted the unnecessary directories and created a config directory and placed the yml file there.
Let's work with the content of the Yaml. I am thinking of putting a default greeting there. The content of this file is parsed and deserialized onto our Configuration.java file.
1defaultGreeting: HelloWe'll need to modify our Configuration.java file to take that into account.
1@Data
2@AllArgsConstructor
3@NoArgsConstructor
4@EqualsAndHashCode(callSuper = true)
5public class Configuration extends io.dropwizard.core.Configuration {
6    public String defaultGreeting;
7}
Notice, that I have added @Data annotation for getters and setters and have also added annotations for constructors. This will be used by jackson for mapping the content of yaml to this configuration object.
Having done, that let's try to run our application. To do that we'll have to click on Edit configuration to take this local.yml file when the app starts.

Edit Configuration
In program arguments we have to provide the path to our local.yml file prefixed with server. Having done that click on Apply and then OK.
1server /path/to/local.yml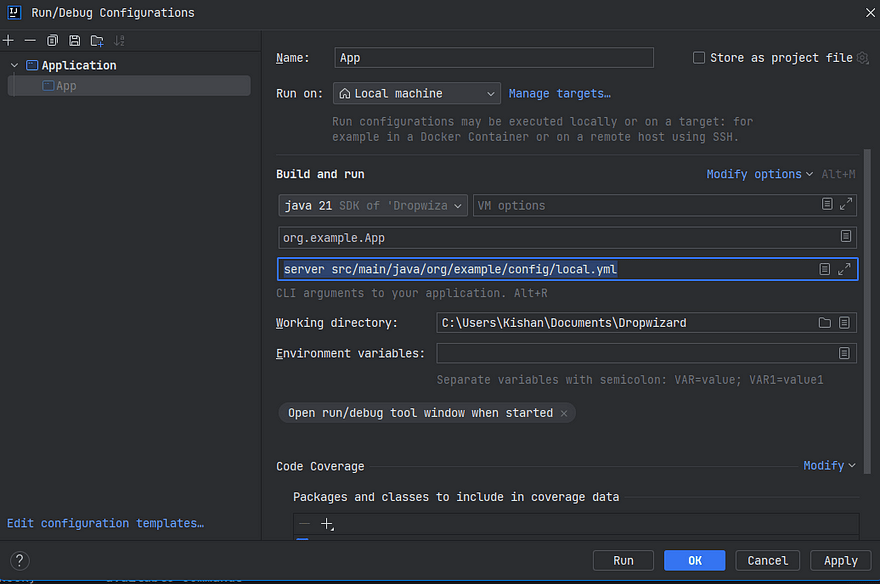
Edit Configuration
Now when you click on run, you'll get a bunch of logs in your terminal.
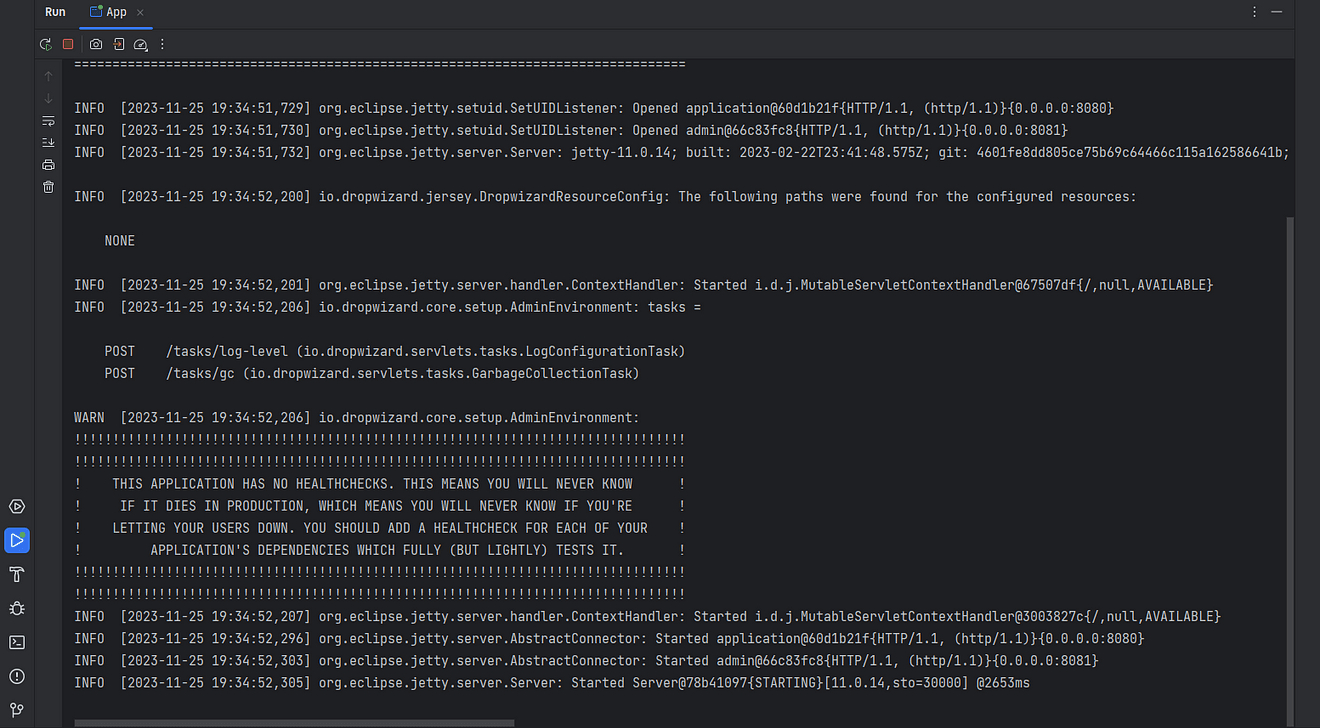
Terminal O/P
This means we have setup our project correctly. If you notice the content of the terminal you'll see that our server has started on port0.0.0.0:8080. Let's head over to it and check what happens.

localhost:8080
We'll see 404, because of course, we haven't mapped our resources yet.
Working with Resources
As mentioned earlier, our main goal is to get "Hello World" if we go to localhost:8080/greet. But if we try that we'll again get 404. So let's fix that.
We'll create a resource class called HelloWorld.java and put that in our resource's directory.
1@Path("/")
2@Produces(MediaType.APPLICATION_JSON)
3public class HelloWorld {
4    @GET
5    @Path("/greet")
6    public String hello() {
7        return "Hello World!";
8    }
9}
As you can see, we have created a method called hello() that returns "Hello World" message whenever someone comes to /greet endpoint. Also we have marked that with @GET HTTP method.
If we run the application now, we should be able to get the greeting right? No!
If you check the logs, you'll see that our resource has not been configured yet with jersey. We'll have to do that in our main class called App.java.

Terminal O/P
1package org.example;
2
3import io.dropwizard.core.Application;
4import io.dropwizard.core.setup.Bootstrap;
5import io.dropwizard.core.setup.Environment;
6import org.example.resources.HelloWorld;
7
8public class App extends Application<Configuration> {
9
10    public static void main(final String[] args) throws Exception {
11        new App().run(args);
12    }
13
14    @Override
15    public String getName() {
16        return "true";
17    }
18
19    @Override
20    public void initialize(final Bootstrap<Configuration> bootstrap) {
21        // TODO: application initialization
22    }
23
24    @Override
25    public void run(final Configuration configuration,
26                    final Environment environment) {
27				// register resources
28        HelloWorld helloWorld = new HelloWorld();
29        environment.jersey().register(helloWorld);
30    }
31
32}
Now, if we run our application and check the logs, we'll see our resource class is registered.

Terminal O/P
Let's head over to /greet and see for ourselves. We'll be greeted with "Hello World"

localhost:8080/greet
Great! But one thing is missing. If you check the logs, you'll get a big warning that the application has no healthchecks. Let's get rid of it by providing a healthcheck.
Checking Health
Since our application is a trivial hello world, there won't be an issue with not providing a healthcheck. But for the completion of this article, we'll create a basic health check.
We'll create a BasicHealthCheck.java class in our healthcheck directory. This class will extend the Dropwizards HealthCheck class and implement the check method.
1package org.example.health;
2import com.codahale.metrics.health.HealthCheck;
3
4public class BasicHealthCheck extends HealthCheck {
5    @Override
6    protected Result check() throws Exception {
7        return Result.healthy();
8    }
9}
Notice, it always return the result as Healthy. If you want to put some additional check you can add that in the check() method.
After that, we'll need to register our basic healthcheck in our main class App.java.
1@Override
2public void run(final Configuration configuration,
3                final Environment environment) {
4    // register resources
5    HelloWorld helloWorld = new HelloWorld();
6    environment.jersey().register(helloWorld);
7    // register health check
8    BasicHealthCheck basicHealthCheck = new BasicHealthCheck();
9    environment.healthChecks().register("basic", basicHealthCheck);
10}
Now if you run your application it will not complain about the healthcheck anymore.
Dropwizard Alternatives
- Spring Boot: A Java framework that simplifies the development of stand-alone, production-grade Spring based applications that you can "just run". It provides a flexible way to configure Java Beans, XML configurations, and Database Transactions. It also features a number of plugins that can be used to enhance its functionality, such as Spring Security, Spring Data, and Spring Cloud.
- Vert.x: A toolkit that provides a set of libraries and utilities to build reactive applications that run on Java Virtual Machine (JVM) . These applications are resource-efficient, concurrent, and contain flexible features. You can check out this article that I've written a few days back and compare how easy it is to spin up a server that greets hello world.
Introduction to Vert.x
Vert.x is called a "Polyglot" toolkit because it supports multiple programming languages and paradigms

- Play: It is a Scala and Java framework that follows the reactive programming principles similar to vert.x to create highly scalable, concurrent, and fault-tolerant applications. It is based on a lightweight, stateless, and web-friendly architecture that makes it easy to build RESTful APIs. It also supports hot code reloading, live reloading, and testing .
- Jmix: A Java framework that provides powerful full stack architecture along with Rapid Application Development tools for easy start and fast development of modern business web applications. It uses Spring Boot, Vaadin, and CUBA Platform as its core components. It also offers a web-based IDE, a visual UI designer, a data modeler, and a report builder.
- OpenXava: A Java framework that allows developers to create enterprise applications using a domain-driven approach. It generates standard Java web applications (JSF, JPA, EJB) from simple Java classes. It also supports AJAX, validations, internationalization, security, and testing.
- GWT (Google Web Toolkit): A Java framework that lets developers build and optimize complex browser-based applications. It compiles Java code into JavaScript, allowing developers to use the same language and tools for both client-side and server-side development. It also provides a set of widgets, templates, and tools to create rich user interfaces.
Congratulations on setting up your first dropwizard application and creating a hello world program. I hope this article proved to be worthy of your time. Thanks a lot.
The 0xkishan Newsletter
Subscribe to the newsletter to learn more about the decentralized web, AI and technology.
Comments on this article
Please be respectful!